前面 binder 说了那多,但是有一个关键的一点前面忽略掉了,就是 binder 对象是传递给另外一个进程使用的,然后还引伸出一个问题,Proc A 是怎么通过 binder 接口找到 Proc B 进行 IPC 调用的。
那这篇主要就是分析这些,照例先把源代码位置啰嗦一下(4.4):
1
2
3
4
5
6
7
8
9
10
11
12
13
14
15
16
17
18
19
20
21
22
frameworks/base/core/java/android/os/IServiceManager.java
frameworks/base/core/java/android/os/ServiceManagerNative.java
frameworks/base/core/java/android/os/ServiceManager.java
frameworks/base/core/java/com/android/internal/os/BinderInternal.java
frameworks/base/core/jni/android_util_Binder.cpp
frameworks/native/cmds/servicemanager
frameworks/native/include/binder/IServiceManager.h
frameworks/native/include/binder/BinderService.h
frameworks/native/libs/binder/IServiceManager.cpp
frameworks/native/libs/binder/ProcessState.cpp
kernel/drivers/staging/android/binder.h
kernel/drivers/staging/android/binder.c
binder 对象的传递分为2种:一种是系统服务的 binder 对象(System Service,简称 SS 吧),一种是普通的第三方应用的服务。为什么会有这2种区别咧,主要是因为 SS 有 ServiceManager(简称 SM 吧)来管理(其实是保存)SS 的 binder 对象,所以可以直接向 SM 取,而第三方应用的服务没 SM 的待遇。
SM 相关接口
natvie 层接口
在说 SM 之前,我们把 SM 的相关接口说下,也就是 SS 是怎么使用的。SM 的接口就下面4个(我的贴的是 native 层的,马甲 java 层的不贴了,一样的):
1
2
3
4
5
6
7
8
9
10
11
12
13
14
15
16
17
18
19
20
21
22
23
24
25
virtual sp<IBinder> getService( const String16& name) const = 0 ;
virtual sp<IBinder> checkService( const String16& name) const = 0 ;
virtual status_t addService( const String16& name,
const sp<IBinder>& service,
bool allowIsolated = false ) = 0 ;
virtual Vector<String16> listServices() = 0 ;
常用的就2个: addService 和 getService。一个拿来注册、一个用来取。这里你会觉得奇怪怎么没有 removeService, SM 是 SS 专用的,SS 正常来说直到系统 shutdown(reboot),都一直存在的,所以不需要 remove。
我们从实际使用来看看 SM 的接口怎么使用。先说 natvie 层的,以 SurfaceFlinger(SF) 为例,在 SF 的 main 函数中:
1
2
3
4
5
6
7
8
9
10
11
12
13
14
15
16
17
18
19
20
21
22
23
24
25
26
27
28
29
30
31
32
33
34
int main(int argc, char ** argv) {
ProcessState::self()->setThreadPoolMaxThreadCount(4 );
sp<ProcessState> ps(ProcessState::self());
ps->startThreadPool();
sp<SurfaceFlinger> flinger = new SurfaceFlinger();
#if defined(HAVE_PTHREADS)
setpriority(PRIO_PROCESS, 0 , PRIORITY_URGENT_DISPLAY);
#endif
set_sched_policy(0 , SP_FOREGROUND);
flinger->init();
sp<IServiceManager> sm(defaultServiceManager());
sm->addService(String16(SurfaceFlinger::getServiceName()), flinger, false );
flinger->run();
return 0 ;
}
前面说了 SS(SF 姑且算 natvie 的 SS 吧) 的原理是,通过向 SM 注册,然其它进程可以通过 SM 取到 SS 的 binder 对象。由于本身向 SM 注册就是跨进程的操作,那么 SS 是怎么取到 SM 的 binder 对象的呢。这是不是有点像鸡生蛋、蛋生鸡呢。结论是 SM 的 binder 对象是特殊的,可以通过特殊的方法可以取得到。
这个 defaultServiceManager() 是 IServiceManager 中的一个全局函数:
1
2
3
4
5
6
7
8
9
10
11
12
13
14
15
16
17
sp<IServiceManager> defaultServiceManager()
{
if (gDefaultServiceManager != NULL) return gDefaultServiceManager;
{
AutoMutex _l(gDefaultServiceManagerLock);
while (gDefaultServiceManager == NULL) {
gDefaultServiceManager = interface_cast<IServiceManager>(
ProcessState::self()->getContextObject(NULL));
if (gDefaultServiceManager == NULL)
sleep(1 );
}
}
return gDefaultServiceManager;
}
关键的在于 ProcessState 的 getContextObject:
1
2
3
4
5
6
7
8
9
10
11
12
13
14
15
16
17
18
19
20
21
22
23
24
25
26
27
28
29
30
31
32
33
34
35
36
37
38
39
40
41
42
43
44
45
46
47
48
49
50
51
52
53
54
55
56
57
58
59
60
61
62
63
64
sp<IBinder> ProcessState::getContextObject(const sp<IBinder>& caller)
{
return getStrongProxyForHandle(0 );
}
sp<IBinder> ProcessState::getStrongProxyForHandle(int32_t handle)
{
sp<IBinder> result;
AutoMutex _l(mLock);
handle_entry* e = lookupHandleLocked(handle);
if (e != NULL) {
IBinder* b = e->binder;
if (b == NULL || !e->refs->attemptIncWeak(this )) {
if (handle == 0 ) {
Parcel data;
status_t status = IPCThreadState::self()->transact(
0 , IBinder::PING_TRANSACTION, data, NULL, 0 );
if (status == DEAD_OBJECT)
return NULL;
}
b = new BpBinder(handle);
e->binder = b;
if (b) e->refs = b->getWeakRefs();
result = b;
} else {
result.force_set(b);
e->refs->decWeak(this );
}
}
return result;
}
那一串长长注释好像是说为了验证 SM 是不是已经注册到 binder 驱动里面去了(后面会说到),所以要 ping 一下。前面那个 lookupHandleLocked 好像是 cache 之类的东西,也不管先。还有那几个我讨厌的引用计数也不管先。最关键的是通过这个函数创建了一个 handle 为 0 的 Bp 端对象。前面几篇说过 handle 就是 binder 对象寻找目标的关键,其他的 Bp handle 都是动态分配的,只有这个 0 是代表 SM 的。
取得 Bp 端之后,就可以调用 IPC 接口了:
1
2
3
4
5
6
7
8
9
10
11
12
13
14
15
16
17
18
19
20
21
22
23
24
25
26
27
28
29
30
31
32
33
34
35
virtual sp<IBinder> getService(const String16& name) const
{
unsigned n;
for (n = 0 ; n < 5 ; n++){
sp<IBinder> svc = checkService(name);
if (svc != NULL) return svc;
ALOGI("Waiting for service %s...\n" , String8(name).string ());
sleep(1 );
}
return NULL;
}
virtual sp<IBinder> checkService( const String16& name) const
{
Parcel data, reply;
data.writeInterfaceToken(IServiceManager::getInterfaceDescriptor());
data.writeString16(name);
remote()->transact(CHECK_SERVICE_TRANSACTION, data, &reply);
return reply.readStrongBinder();
}
virtual status_t addService(const String16& name, const sp<IBinder>& service,
bool allowIsolated)
{
Parcel data, reply;
data.writeInterfaceToken(IServiceManager::getInterfaceDescriptor());
data.writeString16(name);
data.writeStrongBinder(service);
data.writeInt32(allowIsolated ? 1 : 0 );
status_t err = remote()->transact(ADD_SERVICE_TRANSACTION, data, &reply);
return err == NO_ERROR ? reply.readExceptionCode() : err;
}
前面 Parcel 篇说了 parcel 怎么打包 binder 对象的(flat_binder_object)的,这里就没啥难度了。不过你翻遍 IServiceManager.cpp 你发现怎么只有 Bp 端的实现,没有 Bn 端的实现,这好像不太科学。那因为 SM 本身就没用 Binder 面向对象那套东西,当然不会有谁去实现 Bn 端。这个我们在讲 SM 之前,还得先把 java 层的接口讲完先。
java 层接口
同样,我们拿 java 层的 ActivityManager(AM)为例看看 java 层的 SM 接口怎么用,下面是 AM 的一个初始化函数:
1
2
3
4
5
6
7
8
9
10
11
12
13
14
15
16
17
18
19
20
21
22
23
24
public static void setSystemProcess () {
try {
ActivityManagerService m = mSelf;
ServiceManager.addService(Context.ACTIVITY_SERVICE, m, true );
ServiceManager.addService(ProcessStats.SERVICE_NAME, m.mProcessStats);
ServiceManager.addService("meminfo" , new MemBinder(m));
ServiceManager.addService("gfxinfo" , new GraphicsBinder(m));
ServiceManager.addService("dbinfo" , new DbBinder(m));
if (MONITOR_CPU_USAGE) {
ServiceManager.addService("cpuinfo" , new CpuBinder(m));
}
ServiceManager.addService("permission" , new PermissionController(m));
... ...
} catch (PackageManager.NameNotFoundException e) {
throw new RuntimeException(
"Unable to find android system package" , e);
}
}
java 层的 SM 接口在 ServiceManager 这个类中,而且都是 static 方法:
1
2
3
4
5
6
7
8
9
10
11
12
13
14
15
16
17
18
19
20
21
22
23
24
25
26
27
28
29
30
31
32
33
34
35
36
37
public static IBinder getService (String name) {
try {
IBinder service = sCache.get(name);
if (service != null ) {
return service;
} else {
return getIServiceManager().getService(name);
}
} catch (RemoteException e) {
Log.e(TAG, "error in getService" , e);
}
return null ;
}
public static void addService (String name, IBinder service) {
try {
getIServiceManager().addService(name, service, false );
} catch (RemoteException e) {
Log.e(TAG, "error in addService" , e);
}
}
又套马甲了:
1
2
3
4
5
6
7
8
9
10
11
12
13
private static IServiceManager sServiceManager;
private static HashMap<String, IBinder> sCache = new HashMap<String, IBinder>();
private static IServiceManager getIServiceManager () {
if (sServiceManager != null ) {
return sServiceManager;
}
sServiceManager = ServiceManagerNative.asInterface(BinderInternal.getContextObject());
return sServiceManager;
}
ServiceManagerNative 就是前面原理篇中说的 java 层 IInterface 的实现,这里懒得重复贴了(忘记了的回去看看原理篇)。这里主要说参数关键的 IBinder 对象的来源。额,看这名字,多半又是 jni 套 native 层的马甲调用。
1
2
3
4
5
6
7
8
static jobject android_os_BinderInternal_getContextObject(JNIEnv* env, jobject clazz)
{
sp<IBinder> b = ProcessState::self()->getContextObject(NULL);
return javaObjectForIBinder(env, b);
}
果然是,最后还是通过 ProcessState 的 getContextObject 获取 handle 为 0 的 Bp 端对象。
那接下可以说说作为 Bn 端的 SM 的实现了。
ServiceManager
本体
SM 的本体是一个 native 的 app,在 init.rc 中开机启动:
service servicemanager /system/bin/servicemanager
    class core
    user system
    group system
    critical
    onrestart restart healthd
    onrestart restart zygote
    onrestart restart media
    onrestart restart surfaceflinger
    onrestart restart drm
SM 的主要功能就是接受 SS 的注册(addService),对其他进程提供 getService 的服务。所以它其实和 SS 差不多,只不过是 natvie 的而已。但是从它 native 层接口的位置来看,好像 android 把它当成 binder 组成的一部分了。
SM 的原理其实很简单:就是保存了所有的 SS 的 Bp 端的 handle 而已(可以通过这个东西找到 binder node,这个留到后面分析)。然后有人要用服务的时候,能够通过 SM 取得对应的 IBinder 接口(如果在同一进程空间接口是 BBinder,如果不在,则是 BpBinder)。
因此,所有的 SS 都需要向 SM 注册,然后应用可以通过 SM 查询(获取)到注册过的 service 的 IBinder 接口,进而调用 service 提供的服务接口。
既然 SM 是一个单独的程序,那么其他系统 service 要向它注册,或是 apk 通过它获取系统 service 的接口,都需要跨进程。没错, SM 也是使用 binder 通信的,它也提供一些列接口。但是它却没有使用 binder 那一套接口设计的框架,而是直接使用 binder 的驱动接口来完成功能的。怪不得代码是 c,不是 c++ 。
来看 SM 的本体代码,其实代码比较少,模块不算测试代码,就3个文件:
binder.h
binder.c
service_manager.c
main 函数在 service_manager.c 里面:
1
2
3
4
5
6
7
8
9
10
11
12
13
14
15
16
17
18
19
20
21
int main(int argc, char **argv)
{
struct binder_state *bs;
void *svcmgr = BINDER_SERVICE_MANAGER;
bs = binder_open(128 *1024 );
if (binder_become_context_manager(bs)) {
ALOGE("cannot become context manager (%s)\n" , strerror(errno));
return -1 ;
}
svcmgr_handle = svcmgr;
binder_loop(bs, svcmgr_handler);
return 0 ;
}
很简洁。大部分功能都在调用的函数里完成了,一个一个来看。
1、开打 binder 设备驱动。
1
2
3
4
5
6
7
8
9
10
11
12
13
14
15
16
17
18
19
20
21
22
23
24
25
26
27
28
29
30
31
32
33
34
35
36
37
38
39
40
41
42
43
44
45
46
47
48
struct binder_state
{
int fd;
void *mapped;
unsigned mapsize;
};
struct binder_state *binder_open(unsigned mapsize)
{
struct binder_state *bs;
bs = malloc (sizeof (*bs));
if (!bs) {
errno = ENOMEM;
return 0 ;
}
bs->fd = open("/dev/binder" , O_RDWR);
if (bs->fd < 0 ) {
fprintf (stderr,"binder: cannot open device (%s)\n" ,
strerror(errno));
goto fail_open;
}
bs->mapsize = mapsize;
bs->mapped = mmap(NULL, mapsize, PROT_READ, MAP_PRIVATE, bs->fd, 0 );
if (bs->mapped == MAP_FAILED) {
fprintf (stderr,"binder: cannot map device (%s)\n" ,
strerror(errno));
goto fail_map;
}
return bs;
fail_map:
close(bs->fd);
fail_open:
free (bs);
return 0 ;
}
打开 binder 设备比较简单,linux 的基本操作。
2、告诉 binder 自己的进程是 context manager。
1
2
3
4
5
int binder_become_context_manager(struct binder_state *bs)
{
return ioctl(bs->fd, BINDER_SET_CONTEXT_MGR, 0 );
}
ioctl 调用到 binder 驱动中的 binder_ioctl 这个函数,然后我们看下 BINDER_SET_CONTEXT_MGR 命令的处理:
1
2
3
4
5
6
7
8
9
10
11
12
13
14
15
16
17
18
19
20
21
22
23
24
25
26
27
28
29
30
31
32
33
case BINDER_SET_CONTEXT_MGR:
if (binder_context_mgr_node != NULL) {
printk(KERN_ERR "binder: BINDER_SET_CONTEXT_MGR already set\n" );
ret = -EBUSY;
goto err;
}
if (binder_context_mgr_uid != -1 ) {
if (binder_context_mgr_uid != current->cred->euid) {
printk(KERN_ERR "binder: BINDER_SET_"
"CONTEXT_MGR bad uid %d != %d\n" ,
current->cred->euid,
binder_context_mgr_uid);
ret = -EPERM;
goto err;
}
} else
binder_context_mgr_uid = current->cred->euid;
binder_context_mgr_node = binder_new_node(proc, NULL, NULL);
if (binder_context_mgr_node == NULL) {
ret = -ENOMEM;
goto err;
}
binder_context_mgr_node->local_weak_refs++;
binder_context_mgr_node->local_strong_refs++;
binder_context_mgr_node->has_strong_ref = 1 ;
binder_context_mgr_node->has_weak_ref = 1 ;
break ;
binder 驱动里的处理除去前面的检测(防止多次设置 binder 的 context manager,并且也能有效防止一些恶意程序伪造 SM,SM 的由 init.rc 启动,所以可以说是比较早去 binder 驱动里面注册的),就只干了一件事:在 binder 驱动中,创建了一个 binder_context_mgr_node 的东西,这个是一个类型为 binder_node 的结构体。binder_node 在 binder 驱动中代表每一个 Bn 端,binder 驱动可以通过 binder_node 找到对应提供服务的进程,从而找到远程目标,这里后面再慢慢说。这里 binder_new_node 后面2个参数都是 NULL, 这2个参数,一个是 IBinder 的 wp 指针,一个是 IBinder 的指针(Bn 端的), SM 的 binder_node 是很特殊的,直接用一个单独的变量保存。前面说的 SM 的 handle 是 0 固定的,因为人家有单独的变量保存。
3、循环阻塞的等待 binder I/O 的请求数据的到来。
svcmgr_handle 应该是一个函数指针地址,但是这里用法好像很奇怪,我都有点搞不懂:
1
2
3
4
5
6
7
8
9
10
11
12
13
14
15
16
17
18
19
20
21
22
23
24
25
26
typedef int (*binder_handler)(struct binder_state *bs,
struct binder_txn *txn,
struct binder_io *msg,
struct binder_io *reply);
int svcmgr_handler(struct binder_state *bs,
struct binder_txn *txn,
struct binder_io *msg,
struct binder_io *reply)
{
... ...
}
void binder_loop(struct binder_state *bs, binder_handler func)
{
... ...
}
#define BINDER_SERVICE_MANAGER ((void*) 0)
void *svcmgr = BINDER_SERVICE_MANAGER;
svcmgr_handle = svcmgr;
binder_loop(bs, svcmgr_handler);
弄不清楚就算了,反正 binder_loop 那个 handle 函数肯定是 svcmgr_handler 就对了。
通信模型
接着上一节最后的 binder_loop ,这个其实就是 SM 的通信模型了。
1
2
3
4
5
6
7
8
9
10
11
12
13
14
15
16
17
18
19
20
21
22
23
24
25
26
27
28
29
30
31
32
33
34
35
36
37
38
39
40
41
42
43
44
45
46
47
48
49
50
51
52
53
54
55
56
57
58
59
60
61
62
63
void binder_loop(struct binder_state *bs, binder_handler func)
{
int res;
struct binder_write_read bwr;
unsigned readbuf[32 ];
bwr.write_size = 0 ;
bwr.write_consumed = 0 ;
bwr.write_buffer = 0 ;
readbuf[0 ] = BC_ENTER_LOOPER;
binder_write(bs, readbuf, sizeof (unsigned ));
for (;;) {
bwr.read_size = sizeof (readbuf);
bwr.read_consumed = 0 ;
bwr.read_buffer = (unsigned ) readbuf;
res = ioctl(bs->fd, BINDER_WRITE_READ, &bwr);
if (res < 0 ) {
ALOGE("binder_loop: ioctl failed (%s)\n" , strerror(errno));
break ;
}
res = binder_parse(bs, 0 , readbuf, bwr.read_consumed, func);
if (res == 0 ) {
ALOGE("binder_loop: unexpected reply?!\n" );
break ;
}
if (res < 0 ) {
ALOGE("binder_loop: io error %d %s\n" , res, strerror(errno));
break ;
}
}
}
int binder_write(struct binder_state *bs, void *data, unsigned len)
{
struct binder_write_read bwr;
int res;
bwr.write_size = len;
bwr.write_consumed = 0 ;
bwr.write_buffer = (unsigned ) data;
bwr.read_size = 0 ;
bwr.read_consumed = 0 ;
bwr.read_buffer = 0 ;
res = ioctl(bs->fd, BINDER_WRITE_READ, &bwr);
if (res < 0 ) {
fprintf (stderr,"binder_write: ioctl failed (%s)\n" ,
strerror(errno));
}
return res;
}
其实后面的东西, SM 和前面分析的 IPCThreadState 很像,毕竟 IPCThreadState 是封装的 binder 的接口。先是对驱动写一个 BC_ENTER_LOOP 命令,告诉驱动有一个新的线程加入。然后就开始循环等待 Bp 端的请求了(忘记了的回去看通信模型篇)。
然后是真正做事情的 binder_parse:
1
2
3
4
5
6
7
8
9
10
11
12
13
14
15
16
17
18
19
20
21
22
23
24
25
26
27
28
29
30
31
32
33
34
35
36
37
38
39
40
41
42
43
44
45
46
47
48
49
50
51
52
53
54
55
56
57
58
59
60
61
62
63
64
65
66
67
68
69
70
71
72
73
74
75
76
77
78
79
80
81
82
83
84
85
86
87
88
89
90
91
92
int binder_parse(struct binder_state *bs, struct binder_io *bio,
uint32_t *ptr, uint32_t size, binder_handler func)
{
int r = 1 ;
uint32_t *end = ptr + (size / 4 );
while (ptr < end) {
uint32_t cmd = *ptr++;
#if TRACE
fprintf (stderr,"%s:\n" , cmd_name(cmd));
#endif
switch (cmd) {
case BR_NOOP:
break ;
case BR_TRANSACTION_COMPLETE:
break ;
case BR_INCREFS:
case BR_ACQUIRE:
case BR_RELEASE:
case BR_DECREFS:
#if TRACE
fprintf (stderr," %08x %08x\n" , ptr[0 ], ptr[1 ]);
#endif
ptr += 2 ;
break ;
case BR_TRANSACTION: {
struct binder_txn *txn = (void *) ptr;
if ((end - ptr) * sizeof (uint32_t) < sizeof (struct binder_txn)) {
ALOGE("parse: txn too small!\n" );
return -1 ;
}
binder_dump_txn(txn);
if (func) {
unsigned rdata[256 /4 ];
struct binder_io msg;
struct binder_io reply;
int res;
bio_init(&reply, rdata, sizeof (rdata), 4 );
bio_init_from_txn(&msg, txn);
res = func(bs, txn, &msg, &reply);
binder_send_reply(bs, &reply, txn->data, res);
}
ptr += sizeof (*txn) / sizeof (uint32_t);
break ;
}
case BR_REPLY: {
struct binder_txn *txn = (void *) ptr;
if ((end - ptr) * sizeof (uint32_t) < sizeof (struct binder_txn)) {
ALOGE("parse: reply too small!\n" );
return -1 ;
}
binder_dump_txn(txn);
if (bio) {
bio_init_from_txn(bio, txn);
bio = 0 ;
} else {
}
ptr += (sizeof (*txn) / sizeof (uint32_t));
r = 0 ;
break ;
}
case BR_DEAD_BINDER: {
struct binder_death *death = (void *) *ptr++;
death->func(bs, death->ptr);
break ;
}
case BR_FAILED_REPLY:
r = -1 ;
break ;
case BR_DEAD_REPLY:
r = -1 ;
break ;
default :
ALOGE("parse: OOPS %d\n" , cmd);
return -1 ;
}
}
return r;
}
这里差不多感觉就差不多是 IPCThreadState 一个模子里映出来的。前面分析了,Bp transtion 发 BC_TRANSTION 给 binder,binder 会给 Bn 端发 BR_TRANSTION 命令,然后前面 parcel 封装的数据格式是:
cmd + binder_transtion_data
然后看下这里定义的 binder_txn 这个玩意的定义:
1
2
3
4
5
6
7
8
9
10
11
12
13
14
15
16
17
18
struct binder_txn
{
void *target;
void *cookie;
uint32_t code;
uint32_t flags;
uint32_t sender_pid;
uint32_t sender_euid;
uint32_t data_size;
uint32_t offs_size;
void *data;
void *offs;
};
去 Parcel 篇对比下 kernel 的 binder_transtion_data 这里因为参数确定(因为接口就3个),所以直接把那2个 union 给确定下来了。这就是把 binder 驱动的结构扣了出来(我更加确定是2个人写的了,其中有一个就不用原来写好的东西 -_-||)。
然后是 binder_io 这个东西:
1
2
3
4
5
6
7
8
9
10
11
12
13
struct binder_io
{
char *data;
uint32_t *offs;
uint32_t data_avail;
uint32_t offs_avail;
char *data0;
uint32_t *offs0;
uint32_t flags;
uint32_t unused;
};
这个从结构上看虽然不太像直接扣某个东西,其实是为了迁就 Parcel 的结构,回忆下 Parcel 篇说的,对的,data 相当于是 mDataPos, offs 相当于是 mObjectPos(Parcel 没这个东西,但是这里的意义相当于是这个),data0 相当于 mData,offs0 相当于 mObjects,data_avail 相当于是 mDataSize,offs_avail 相当于是 mObjectSize。这些后面用的时候就能看出来了。再吐槽下 reply 这个名字都和 IPCThreadState 中的一样。
然后我们接下来看那看 bio_init 这2个函数:
1
2
3
4
5
6
7
8
9
10
11
12
13
14
15
16
17
18
19
20
21
22
23
24
25
26
27
28
29
30
31
void bio_init_from_txn(struct binder_io *bio, struct binder_txn *txn)
{
bio->data = bio->data0 = txn->data;
bio->offs = bio->offs0 = txn->offs;
bio->data_avail = txn->data_size;
bio->offs_avail = txn->offs_size / 4 ;
bio->flags = BIO_F_SHARED;
}
void bio_init(struct binder_io *bio, void *data,
uint32_t maxdata, uint32_t maxoffs)
{
uint32_t n = maxoffs * sizeof (uint32_t);
if (n > maxdata) {
bio->flags = BIO_F_OVERFLOW;
bio->data_avail = 0 ;
bio->offs_avail = 0 ;
return ;
}
bio->data = bio->data0 = (char *) data + n;
bio->offs = bio->offs0 = data;
bio->data_avail = maxdata - n;
bio->offs_avail = maxoffs;
bio->flags = 0 ;
}
回去看下 Parcel 篇的内存结构,放 flat_binder_object offset 的数组和本体的 data 数据是分开放的,这里图省事,放到一起了,从目前传递参数来看,前 4x4字节 是存放 offset 数组的(最多只能放4个 flat_binder_object),然后紧接着就是 256/4 - 4*4 的数据了。内存结构应该是这样的(懒得画图了,凑活一下):
| offset | data |
然后那个 bio_init_from_txn 由于用的是 binder_txn(binder_transtion_data) 的数据,所以 data 和 offs 指向的是 binder_txn 的 data 和 offs。
然后是到真正实现 SM 业务的函数了,这里说2个主要功能: addService 和 getService:
1
2
3
4
5
6
7
8
9
10
11
12
13
14
15
16
17
18
19
20
21
22
23
24
25
26
27
28
29
30
31
32
33
34
35
36
37
38
39
40
41
42
43
44
45
46
47
48
49
50
51
52
53
54
55
56
57
58
59
60
61
62
63
64
65
66
67
68
69
70
71
72
73
int svcmgr_handler(struct binder_state *bs,
struct binder_txn *txn,
struct binder_io *msg,
struct binder_io *reply)
{
struct svcinfo *si;
uint16_t *s;
unsigned len;
void *ptr;
uint32_t strict_policy;
int allow_isolated;
if (txn->target != svcmgr_handle)
return -1 ;
strict_policy = bio_get_uint32(msg);
s = bio_get_string16(msg, &len);
if ((len != (sizeof (svcmgr_id) / 2 )) ||
memcmp (svcmgr_id, s, sizeof (svcmgr_id))) {
fprintf (stderr,"invalid id %s\n" , str8(s));
return -1 ;
}
switch (txn->code) {
case SVC_MGR_GET_SERVICE:
case SVC_MGR_CHECK_SERVICE:
s = bio_get_string16(msg, &len);
ptr = do_find_service(bs, s, len, txn->sender_euid);
if (!ptr)
break ;
bio_put_ref(reply, ptr);
return 0 ;
case SVC_MGR_ADD_SERVICE:
s = bio_get_string16(msg, &len);
ptr = bio_get_ref(msg);
allow_isolated = bio_get_uint32(msg) ? 1 : 0 ;
if (do_add_service(bs, s, len, ptr, txn->sender_euid, allow_isolated))
return -1 ;
break ;
case SVC_MGR_LIST_SERVICES: {
unsigned n = bio_get_uint32(msg);
si = svclist;
while ((n-- > 0 ) && si)
si = si->next;
if (si) {
bio_put_string16(reply, si->name);
return 0 ;
}
return -1 ;
}
default :
ALOGE("unknown code %d\n" , txn->code);
return -1 ;
}
bio_put_uint32(reply, 0 );
return 0 ;
}
在说真正的业务函数之前,先把一些细节说一下。最开始 txn->target != svcmgr_handle 这里,我终于知道前面那个
#define BINDER_SERVICE_MANAGER ((void*) 0)
是什么意思了。SM 的 Bp handle 是 0,所以 binder_transtion_data 的 target 肯定是 0,这里做一个验证。然后后面那个取字符串:
1
2
3
4
5
6
7
8
9
10
11
12
13
14
15
16
17
18
19
20
21
22
23
24
25
26
27
28
29
30
31
32
33
34
35
36
static void *bio_get(struct binder_io *bio, uint32_t size)
{
size = (size + 3 ) & (~3 );
if (bio->data_avail < size){
bio->data_avail = 0 ;
bio->flags |= BIO_F_OVERFLOW;
return 0 ;
} else {
void *ptr = bio->data;
bio->data += size;
bio->data_avail -= size;
return ptr;
}
}
uint32_t bio_get_uint32(struct binder_io *bio)
{
uint32_t *ptr = bio_get(bio, sizeof (*ptr));
return ptr ? *ptr : 0 ;
}
uint16_t *bio_get_string16(struct binder_io *bio, unsigned *sz)
{
unsigned len;
len = bio_get_uint32(bio);
if (sz)
*sz = len;
return bio_get(bio, (len + 1 ) * sizeof (uint16_t));
}
这里的代码就是和 parcel 读、写差不多。回到前面,注释说得很清楚了,因为 IPC 的协议定死了,前面一串字符是 service 的 id 标志,在 Bn 端可以用来验证,是不是本 service 的 Bp 端发送过来的请求,所以这里取前面一串字符(第一个 int32 是长度),然后和自己的 id 对比:
1
2
3
4
5
6
7
8
9
uint16_t svcmgr_id[] = {
'a' ,'n' ,'d' ,'r' ,'o' ,'i' ,'d' ,'.' ,'o' ,'s' ,'.' ,
'I' ,'S' ,'e' ,'r' ,'v' ,'i' ,'c' ,'e' ,'M' ,'a' ,'n' ,'a' ,'g' ,'e' ,'r'
};
IMPLEMENT_META_INTERFACE(ServiceManager, "android.os.IServiceManager" );
然后后面 binder_transtion_data 中的 code 了,唉,前面连结构体都能扣出来,几个 int 值还搞不定么:
1
2
3
4
5
6
7
8
9
10
11
12
13
14
15
16
17
18
19
20
21
22
23
24
25
26
27
28
29
30
31
32
33
enum {
SVC_MGR_GET_SERVICE = 1 ,
SVC_MGR_CHECK_SERVICE,
SVC_MGR_ADD_SERVICE,
SVC_MGR_LIST_SERVICES,
};
enum {
GET_SERVICE_TRANSACTION = IBinder::FIRST_CALL_TRANSACTION,
CHECK_SERVICE_TRANSACTION,
ADD_SERVICE_TRANSACTION,
LIST_SERVICES_TRANSACTION,
};
enum {
FIRST_CALL_TRANSACTION = 0x00000001 ,
LAST_CALL_TRANSACTION = 0x00ffffff ,
PING_TRANSACTION = B_PACK_CHARS('_' ,'P' ,'N' ,'G' ),
DUMP_TRANSACTION = B_PACK_CHARS('_' ,'D' ,'M' ,'P' ),
INTERFACE_TRANSACTION = B_PACK_CHARS('_' , 'N' , 'T' , 'F' ),
SYSPROPS_TRANSACTION = B_PACK_CHARS('_' , 'S' , 'P' , 'R' ),
FLAG_ONEWAY = 0x00000001
};
然后我们先讲 addService。SS 自己把自己 new 出来之后(Bn 端对象),然后通过 SM&)当作参数传递给 addService 然后传给 SM。再传到 SM 这里之前,我们这里可以把前面几篇中留的一些坑给填上,就是 binder 驱动里面是怎么找到指定的目标进程的。这里我们先说特殊的 Bp 端(SM 的)。
前面说 SM 的 Bp handle 是 0,然后也是经过 IPCThreadState transation,然后 ioctl 一步步写到 kernel 的驱动里面,这里 addService 的话,就应该到了 binder_transtion 那里:
1
2
3
4
5
6
7
8
9
10
11
12
13
14
15
16
17
18
19
20
21
22
23
24
25
26
27
28
29
30
31
32
33
34
35
36
37
38
39
40
41
42
43
44
45
46
47
48
49
50
51
52
static void binder_transaction(struct binder_proc *proc,
struct binder_thread *thread,
struct binder_transaction_data *tr, int reply)
{
struct binder_transaction *t;
struct binder_work *tcomplete;
size_t *offp, *off_end;
struct binder_proc *target_proc;
struct binder_thread *target_thread = NULL;
struct binder_node *target_node = NULL;
struct list_head *target_list;
wait_queue_head_t *target_wait;
struct binder_transaction *in_reply_to = NULL;
struct binder_transaction_log_entry *e;
uint32_t return_error;
e = binder_transaction_log_add(&binder_transaction_log);
e->call_type = reply ? 2 : !!(tr->flags & TF_ONE_WAY);
e->from_proc = proc->pid;
e->from_thread = thread->pid;
e->target_handle = tr->target.handle;
e->data_size = tr->data_size;
e->offsets_size = tr->offsets_size;
if (reply) {
... ...
} else {
if (tr->target.handle) {
... ...
} else {
target_node = binder_context_mgr_node;
if (target_node == NULL) {
return_error = BR_DEAD_REPLY;
goto err_no_context_mgr_node;
}
}
e->to_node = target_node->debug_id;
target_proc = target_node->proc;
if (target_proc == NULL) {
return_error = BR_DEAD_REPLY;
goto err_dead_binder;
}
... ...
}
... ...
}
我们再回过头来看看当时 SM SET_CONTEXT_MGR 的时候 new 出来的 binder
_node:
1
2
3
4
5
6
7
8
9
10
11
12
13
14
15
16
17
18
19
20
21
22
23
24
25
26
27
28
29
30
31
32
33
34
35
36
37
38
39
40
41
42
43
static struct binder_node *binder_new_node(struct binder_proc *proc,
void __user *ptr,
void __user *cookie)
{
struct rb_node **p = &proc->nodes.rb_node;
struct rb_node *parent = NULL;
struct binder_node *node;
while (*p) {
parent = *p;
node = rb_entry(parent, struct binder_node, rb_node);
if (ptr < node->ptr)
p = &(*p)->rb_left;
else if (ptr > node->ptr)
p = &(*p)->rb_right;
else
return NULL;
}
node = kzalloc(sizeof (*node), GFP_KERNEL);
if (node == NULL)
return NULL;
binder_stats_created(BINDER_STAT_NODE);
rb_link_node(&node->rb_node, parent, p);
rb_insert_color(&node->rb_node, &proc->nodes);
node->debug_id = ++binder_last_id;
node->proc = proc;
node->ptr = ptr;
node->cookie = cookie;
node->work.type = BINDER_WORK_NODE;
INIT_LIST_HEAD(&node->work.entry);
INIT_LIST_HEAD(&node->async_todo);
binder_debug(BINDER_DEBUG_INTERNAL_REFS,
"binder: %d:%d node %d u%p c%p created\n" ,
proc->pid, current->pid, node->debug_id,
node->ptr, node->cookie);
return node;
}
binder_new_node new 出来的 node 保存了 binder 对象本地指针(后面会发现只有 Bn 端对象才会创建 node, Bp 端的全是引用(ref)),和相应的进程信息。这样通过 binder_node 就可以找到通信的目标进程。 SM 传递过去的 ptr 和 cookie 是 NULL, SM 的接口就没实现 Bn 端,所以不需要吧。
通过 handle 0 找到了 SM 的 binder_node 节点,进而找到 SM 的进程,然后根据通信篇讲的,唤醒 ioctl 等待 read 的线程,就能够从 ioctl 那返回了,上面就是前面的回到 SM 的 svcmgr_handler 的 SVC_MGR_ADD_SERVICE 处理那里了(代码再贴一次吧):
1
2
3
4
5
6
7
8
9
10
11
case SVC_MGR_ADD_SERVICE:
s = bio_get_string16(msg, &len);
ptr = bio_get_ref(msg);
allow_isolated = bio_get_uint32(msg) ? 1 : 0 ;
if (do_add_service(bs, s, len, ptr, txn->sender_euid, allow_isolated))
return -1 ;
break ;
这里和 Parcel 篇的一样,要注意读、写顺序,咋贴下 SM 接口实现中写的顺序:
1
2
3
4
5
6
7
8
9
10
11
12
13
public void addService (String name, IBinder service, boolean allowIsolated)
throws RemoteException {
Parcel data = Parcel.obtain();
Parcel reply = Parcel.obtain();
data.writeInterfaceToken(IServiceManager.descriptor);
data.writeString(name);
data.writeStrongBinder(service);
data.writeInt(allowIsolated ? 1 : 0 );
mRemote.transact(ADD_SERVICE_TRANSACTION, data, reply, 0 );
reply.recycle();
data.recycle();
}
Bn 端的标志字符串最开始读去了,然后是 addService 要传递一个字符串名字,代表这个 SS 的名字(Context 里面定义的那一堆 ACTIVITY_SERVICE 之类的东西就是一个字符串,而且不是以包名来命名的,但是 SS 是系统开发的,所以可以人为的保证不重复)。然后是 Parcel 篇说到 writeStrongBinder 接口了,这个接口把 flat_binder_object 对象写入 Parcel 的数据内存中。如果是 Bn 端的话 flat_binder_object 的 binder 指针就是 binder 对象本身(addService 当然是 Bn 端)。SM 使用 bio_get_ref 取 flat_binder_object 数据:
1
2
3
4
5
6
7
8
9
10
11
12
13
14
15
16
17
18
19
20
21
22
23
24
25
26
27
28
29
30
31
32
33
static struct binder_object *_bio_get_obj(struct binder_io *bio)
{
unsigned n;
unsigned off = bio->data - bio->data0;
for (n = 0 ; n < bio->offs_avail; n++) {
if (bio->offs[n] == off)
return bio_get(bio, sizeof (struct binder_object));
}
bio->data_avail = 0 ;
bio->flags |= BIO_F_OVERFLOW;
return 0 ;
}
void *bio_get_ref(struct binder_io *bio)
{
struct binder_object *obj;
obj = _bio_get_obj(bio);
if (!obj)
return 0 ;
if (obj->type == BINDER_TYPE_HANDLE)
return obj->pointer;
return 0 ;
}
这里取 flat_binder_object 有好几个地方要说,一个一个来。首先上面那个 _bio_get_object 的写法有点奇怪,注释也说是不是要采用才好的办法,其实还是和写的顺序有关,前面把 writeInterfaceToken、writeString 的都取完了,那么现在指针的位置就应该在 flat_binder_object 那了,而且 offset 数组的第一个就是 object 的偏移,就是说直接 bio->data0 + bio_offs[0] 或者 bio->data 都是可以直接取地址的。但是它偏得麻烦的判断一下,我也不知道为什么要这样。
然后取出来的, SM 把它转成 binder_object 这个结构了:
1
2
3
4
5
6
7
8
struct binder_object
{
uint32_t type;
uint32_t flags;
void *pointer;
void *cookie;
};
我这里就懒得贴 flat_binder_object 的结构对比了(你以为你改下变量名我就不认识你啦)。
然后下面 if (obj->type == BINDER_TYPE_HANDLE) 这个判断,就是说只有 type 是 handle 的时候才会返回有效值。但是通过前面的讲解我们知道,type handle 表示的是 Bp 端,但是 SS addService 传过来的 flat_binder_object 是 BINDER_TYPE_BINDER(Bn 端) 来的。这不是矛盾的么。这里还得再回到 binder 驱动的 binder_transtion 这个函数里,我们把 Parcel 篇中忽略的东西在这里说清楚:
1
2
3
4
5
6
7
8
9
10
11
12
13
14
15
16
17
18
19
20
21
22
23
24
25
26
27
28
29
30
31
32
33
34
35
36
37
38
39
40
41
42
43
44
45
46
47
48
49
50
51
52
53
54
55
56
57
58
59
60
61
62
63
64
65
66
67
68
69
70
71
72
73
74
75
76
77
78
79
80
81
82
83
84
85
86
87
88
89
90
91
92
93
94
95
96
97
98
99
100
101
102
103
104
105
106
107
108
109
110
111
112
113
114
115
116
117
118
119
120
121
122
static void binder_transaction(struct binder_proc *proc,
struct binder_thread *thread,
struct binder_transaction_data *tr, int reply)
{
struct binder_transaction *t;
struct binder_work *tcomplete;
size_t *offp, *off_end;
struct binder_proc *target_proc;
struct binder_thread *target_thread = NULL;
struct binder_node *target_node = NULL;
struct list_head *target_list;
wait_queue_head_t *target_wait;
struct binder_transaction *in_reply_to = NULL;
struct binder_transaction_log_entry *e;
uint32_t return_error;
... ...
offp = (size_t *)(t->buffer->data + ALIGN(tr->data_size, sizeof (void *)));
if (copy_from_user(t->buffer->data, tr->data.ptr.buffer, tr->data_size)) {
binder_user_error("binder: %d:%d got transaction with invalid "
"data ptr\n" , proc->pid, thread->pid);
return_error = BR_FAILED_REPLY;
goto err_copy_data_failed;
}
if (copy_from_user(offp, tr->data.ptr.offsets, tr->offsets_size)) {
binder_user_error("binder: %d:%d got transaction with invalid "
"offsets ptr\n" , proc->pid, thread->pid);
return_error = BR_FAILED_REPLY;
goto err_copy_data_failed;
}
if (!IS_ALIGNED(tr->offsets_size, sizeof (size_t))) {
binder_user_error("binder: %d:%d got transaction with "
"invalid offsets size, %zd\n" ,
proc->pid, thread->pid, tr->offsets_size);
return_error = BR_FAILED_REPLY;
goto err_bad_offset;
}
off_end = (void *)offp + tr->offsets_size;
for (; offp < off_end; offp++) {
struct flat_binder_object *fp;
if (*offp > t->buffer->data_size - sizeof (*fp) ||
t->buffer->data_size < sizeof (*fp) ||
!IS_ALIGNED(*offp, sizeof (void *))) {
binder_user_error("binder: %d:%d got transaction with "
"invalid offset, %zd\n" ,
proc->pid, thread->pid, *offp);
return_error = BR_FAILED_REPLY;
goto err_bad_offset;
}
fp = (struct flat_binder_object *)(t->buffer->data + *offp);
switch (fp->type) {
case BINDER_TYPE_BINDER:
case BINDER_TYPE_WEAK_BINDER: {
struct binder_ref *ref;
struct binder_node *node = binder_get_node(proc, fp->binder);
if (node == NULL) {
node = binder_new_node(proc, fp->binder, fp->cookie);
if (node == NULL) {
return_error = BR_FAILED_REPLY;
goto err_binder_new_node_failed;
}
node->min_priority = fp->flags & FLAT_BINDER_FLAG_PRIORITY_MASK;
node->accept_fds = !!(fp->flags & FLAT_BINDER_FLAG_ACCEPTS_FDS);
}
if (fp->cookie != node->cookie) {
binder_user_error("binder: %d:%d sending u%p "
"node %d, cookie mismatch %p != %p\n" ,
proc->pid, thread->pid,
fp->binder, node->debug_id,
fp->cookie, node->cookie);
goto err_binder_get_ref_for_node_failed;
}
ref = binder_get_ref_for_node(target_proc, node);
if (ref == NULL) {
return_error = BR_FAILED_REPLY;
goto err_binder_get_ref_for_node_failed;
}
if (fp->type == BINDER_TYPE_BINDER)
fp->type = BINDER_TYPE_HANDLE;
else
fp->type = BINDER_TYPE_WEAK_HANDLE;
fp->handle = ref->desc;
binder_inc_ref(ref, fp->type == BINDER_TYPE_HANDLE,
&thread->todo);
binder_debug(BINDER_DEBUG_TRANSACTION,
" node %d u%p -> ref %d desc %d\n" ,
node->debug_id, node->ptr, ref->debug_id,
ref->desc);
} break ;
... ...
default :
binder_user_error("binder: %d:%d got transactio"
"n with invalid object type, %lx\n" ,
proc->pid, thread->pid, fp->type);
return_error = BR_FAILED_REPLY;
goto err_bad_object_type;
}
}
... ...
}
最开始 offp 获取内存那里,还记得内存管理篇,说每个 binder 进程分配的那 1M 的用来接收数据的内存不,这里派上用场了(其实主要用的还是目标进程,这里只是把 flat_binder_object 加工一下而已)。用来接收 Proc A parcel 打包的数据(data + offset)。下面,先把 data copy 过来,然后再是 offset。由于 flat_binder_object 可以打包多个,所以是一个循环。Parcle 篇不止说了一次 mObects 是偏移地址,这里取 flat_binder_object 又再一次证明了。flat_binder_object 里面放的东西,这里要经过一些转化才能传递给目标进程使用。
这得分情况,这里先说 BINDER_TYPE_BINDER 的情况。因为之前一直在说 addService。那么作为 Bn 端的 service 传递过来的肯定是 BINDER_TYPE_BINDER。
首先先去 addService 的进程中去查找是不是已经创建过 binder_node 了:
1
2
3
4
5
6
7
8
9
10
11
12
13
14
15
16
17
18
19
20
static struct binder_node *binder_get_node(struct binder_proc *proc,
void __user *ptr)
{
struct rb_node *n = proc->nodes.rb_node;
struct binder_node *node;
while (n) {
node = rb_entry(n, struct binder_node, rb_node);
if (ptr < node->ptr)
n = n->rb_left;
else if (ptr > node->ptr)
n = n->rb_right;
else
return node;
}
return NULL;
}
`
前面看到 binder_new_node 是会把创建的 node 保存到 proc 的一颗红黑树里面的。如果没找到(也就是之前没创建过),那就创建一个。这里要注意一点,这里把 flat_binder_object 的 binder 对象保存到 node 里面去了。为什么要注意这点,后面创建 ref 的时候会知道原因的。接着就要分配一个这个 node 的引用:
1
2
3
4
5
6
7
8
9
10
11
12
13
14
15
16
17
18
19
20
21
22
23
24
25
26
27
28
29
30
31
32
33
34
35
36
37
38
39
40
41
42
43
44
45
46
47
48
49
50
51
52
53
54
55
56
57
58
59
60
61
62
63
64
65
66
67
68
69
70
71
72
73
74
75
static struct binder_ref *binder_get_ref_for_node(struct binder_proc *proc,
struct binder_node *node)
{
struct rb_node *n;
struct rb_node **p = &proc->refs_by_node.rb_node;
struct rb_node *parent = NULL;
struct binder_ref *ref, *new_ref;
while (*p) {
parent = *p;
ref = rb_entry(parent, struct binder_ref, rb_node_node);
if (node < ref->node)
p = &(*p)->rb_left;
else if (node > ref->node)
p = &(*p)->rb_right;
else
return ref;
}
new_ref = kzalloc(sizeof (*ref), GFP_KERNEL);
if (new_ref == NULL)
return NULL;
binder_stats_created(BINDER_STAT_REF);
new_ref->debug_id = ++binder_last_id;
new_ref->proc = proc;
new_ref->node = node;
rb_link_node(&new_ref->rb_node_node, parent, p);
rb_insert_color(&new_ref->rb_node_node, &proc->refs_by_node);
new_ref->desc = (node == binder_context_mgr_node) ? 0 : 1 ;
for (n = rb_first(&proc->refs_by_desc); n != NULL; n = rb_next(n)) {
ref = rb_entry(n, struct binder_ref, rb_node_desc);
if (ref->desc > new_ref->desc)
break ;
new_ref->desc = ref->desc + 1 ;
}
p = &proc->refs_by_desc.rb_node;
while (*p) {
parent = *p;
ref = rb_entry(parent, struct binder_ref, rb_node_desc);
if (new_ref->desc < ref->desc)
p = &(*p)->rb_left;
else if (new_ref->desc > ref->desc)
p = &(*p)->rb_right;
else
BUG();
}
rb_link_node(&new_ref->rb_node_desc, parent, p);
rb_insert_color(&new_ref->rb_node_desc, &proc->refs_by_desc);
if (node) {
hlist_add_head(&new_ref->node_entry, &node->refs);
binder_debug(BINDER_DEBUG_INTERNAL_REFS,
"binder: %d new ref %d desc %d for "
"node %d\n" , proc->pid, new_ref->debug_id,
new_ref->desc, node->debug_id);
} else {
binder_debug(BINDER_DEBUG_INTERNAL_REFS,
"binder: %d new ref %d desc %d for "
"dead node\n" , proc->pid, new_ref->debug_id,
new_ref->desc);
}
return new_ref;
}
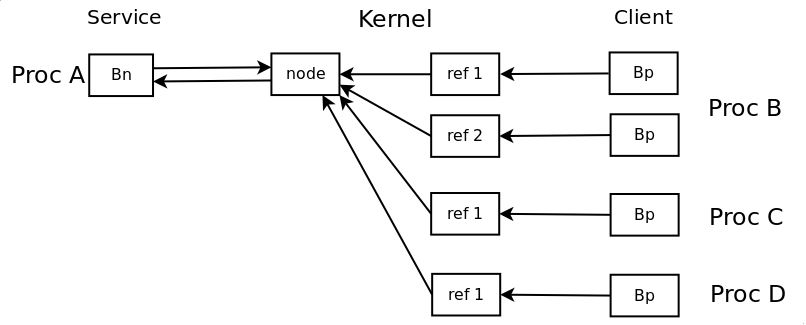
这里可以说下 node 和 ref 的关系了。一个 Bn 端对应一个 node,一个 Bp 端对应一个 ref, 同一个 service 的 Bn 端只有一个,所以 node 只有一个,但是一个 service 可以被多个 client 请求(Bp 端),所以 ref 可以有多个,并且是进程相关的。就是说 ref 的 desc 是进程相关的,一个进程内唯一,但是放到别的进程无法识别。desc 0 代表 SM 的 Bp 端,SM 的 node 由特殊的变量保存。binder 对象 Bn 端传递到目标进程变成 Bp 端,然后 Bp 端通过 desc 在 kernel 中可以找到 ref,通过 ref 可以找到引用的 node,然后通过 node 可以找到这个 node 的 Bn 端所在的进程,就能把请求发送到目标进程了。来张图,形象点:
分配好 ref 后,就有了 ref 的 desc(handle),然后把这个 handle 保存在了 fp->handle 里面。这里是一个需要注意的地方,回忆下 flat_binder_object 的结构,你会发现 binder 和 handle 是一个 union,就是说同一个时候只能用一个。这里设置了 handle 就会把 binder 的值给覆盖掉。这个是关键的一点,后面 SM 保存 flat_binder_object 的时候能看到这么处理的意义。
然后这里说下为什么后面把 BINDER_TYPE_BINDER 变成了 BINDER_TYPE_HANDLE 。因为 binder 对象自身是本地对象,只能在 Bn 端才有效(通过它调用本地的接口),在远程是无法使用的(要能用就没 IPC 什么事了),所以远程要持有 Bp 对象才有用。因此 Bn 端通过 writeStrong 把本地的 binder 对象打包成 flat_binder_object,经过 kernel 的时候,要传递到对方(目标进程),就需要把 Proc A 的本地 binder 对象变成 Proc B 中的 远程对象(Bp 对象),所以这里才有了 BINDER_TYPE_BINDER 变 BINDER_TYPE_HANDLE 的处理。同理如果 Proc B 中把 Proc A 的 Bp 对象反过来传递给 Proc A 的话,kernel 会把 Bp 转成 Bn 的,binder_transtion 的后面那个 case 会有这样的处理,后面会看到。
到这里你就应该能理解为什么 addService 调用的 bio_get_ref 后面会判断 type 要是 BINDER_TYPE_HANDLE 才会返回 flat_binder_object 的有效值吧。如果这里是 BINDER_TYPE_HANDLE 对方传递的才是 Bn。然后回想下 SM 山寨的 binder_object 结构体,那个 pointer 其实就是 flat_binder_object 的 union,本来我以为 SS 传递过来的应该是本地的 binder 指针的,但是 kernel 那里一转化,就用 Bp 的 handle 值把本地的 binder 对象给覆盖掉了,SS 的本地 binder 对象是保存在了 kernel 的 node 里面,SM 里保存的是 Bp 的 handle 值而已。其实想想看也应该是这样,在另一个进程里面保存本地的 binder 对象根本就没意义,只有在 SS 本进程中本地 binder 对象才于意义,所以另外进程里有意义的是 Bp 的 handle 值。
然后最后我们可以来看看 do_add_service 的处理了:
1
2
3
4
5
6
7
8
9
10
11
12
13
14
15
16
17
18
19
20
21
22
23
24
25
26
27
28
29
30
31
32
33
34
35
36
37
38
39
40
41
42
43
44
45
46
47
48
49
50
51
52
53
54
55
56
57
58
59
60
61
int do_add_service(struct binder_state *bs,
uint16_t *s, unsigned len,
void *ptr, unsigned uid, int allow_isolated)
{
struct svcinfo *si;
if (!ptr || (len == 0 ) || (len > 127 ))
return -1 ;
if (!svc_can_register(uid, s)) {
ALOGE("add_service('%s',%p) uid=%d - PERMISSION DENIED\n" ,
str8(s), ptr, uid);
return -1 ;
}
si = find_svc(s, len);
if (si) {
if (si->ptr) {
ALOGE("add_service('%s',%p) uid=%d - ALREADY REGISTERED, OVERRIDE\n" ,
str8(s), ptr, uid);
svcinfo_death(bs, si);
}
si->ptr = ptr;
} else {
si = malloc (sizeof (*si) + (len + 1 ) * sizeof (uint16_t));
if (!si) {
ALOGE("add_service('%s',%p) uid=%d - OUT OF MEMORY\n" ,
str8(s), ptr, uid);
return -1 ;
}
si->ptr = ptr;
si->len = len;
memcpy (si->name, s, (len + 1 ) * sizeof (uint16_t));
si->name[len] = '\0' ;
si->death.func = svcinfo_death;
si->death.ptr = si;
si->allow_isolated = allow_isolated;
si->next = svclist;
svclist = si;
}
binder_acquire(bs, ptr);
binder_link_to_death(bs, ptr, &si->death);
return 0 ;
}
首先看一个结构体:
1
2
3
4
5
6
7
8
9
10
11
12
13
14
struct svcinfo
{
struct svcinfo *next;
void *ptr;
struct binder_death death;
int allow_isolated;
unsigned len;
uint16_t name[0 ];
};
SM 拿了一个链表来保存 svcinfo 结构,svclist 这个变量就是链表头。然后 do_add_service 这个函数的处理也挺简单的,先是检测请求注册的进程是否有权限能够注册:
1
2
3
4
5
6
7
8
9
10
11
12
13
14
15
16
17
18
19
20
21
22
23
24
25
26
27
28
29
30
31
32
33
34
35
36
37
38
39
40
41
42
43
44
45
46
47
48
49
50
static struct {
unsigned uid;
const char *name;
} allowed[] = {
{ AID_MEDIA, "media.audio_flinger" },
{ AID_MEDIA, "media.log" },
{ AID_MEDIA, "media.player" },
{ AID_MEDIA, "media.camera" },
{ AID_MEDIA, "media.audio_policy" },
{ AID_DRM, "drm.drmManager" },
{ AID_NFC, "nfc" },
{ AID_BLUETOOTH, "bluetooth" },
{ AID_RADIO, "radio.phone" },
{ AID_RADIO, "radio.sms" },
{ AID_RADIO, "radio.phonesubinfo" },
{ AID_RADIO, "radio.simphonebook" },
{ AID_RADIO, "phone" },
{ AID_RADIO, "sip" },
{ AID_RADIO, "isms" },
{ AID_RADIO, "iphonesubinfo" },
{ AID_RADIO, "simphonebook" },
{ AID_MEDIA, "common_time.clock" },
{ AID_MEDIA, "common_time.config" },
{ AID_KEYSTORE, "android.security.keystore" },
};
int svc_can_register(unsigned uid, uint16_t *name)
{
unsigned n;
if ((uid == 0 ) || (uid == AID_SYSTEM))
return 1 ;
for (n = 0 ; n < sizeof (allowed) / sizeof (allowed[0 ]); n++)
if ((uid == allowed[n].uid) && str16eq(name, allowed[n].name))
return 1 ;
return 0 ;
}
看样子 root 启动的进程、系统程序、还有一些特殊的 uid 能够向 SM 注册 SS。当然自己定义的系统的话,可以加一些 uid 进去。
之后就是查找发过来的 Service 之前是否注册过:
1
2
3
4
5
6
7
8
9
10
11
12
13
14
struct svcinfo *find_svc(uint16_t *s16, unsigned len)
{
struct svcinfo *si;
for (si = svclist; si; si = si->next) {
if ((len == si->len) &&
!memcmp (s16, si->name, len * sizeof (uint16_t))) {
return si;
}
}
return 0 ;
}
SM 里标示 SS 的是 SS 的 name,所以自己定制系统的时候新加一个 SS 不要取和原来系统名字一样的。已经注册过了把原来的弄死,就用的代替原来旧的,没有的话就新创建一个 svcinfo 结构,然后插入到链表中。后面设置一些死亡通知的回调,后面再说。之后就是要手动增加 binder_node 的引用计数(这里不贴这部分的源码了)。
addService 算是说完了,就是 SM 拿了一个链表来保存所有的 SS 在 SM 本进程中的 Bp handle 值。那么相应的 getService 就是从这个链表中取出 SS 的 Bp,然后通过 kernel 传递给对应的进程(又重复贴代码了):
1
2
3
4
5
6
7
8
9
10
11
12
13
case SVC_MGR_GET_SERVICE:
case SVC_MGR_CHECK_SERVICE:
s = bio_get_string16(msg, &len);
ptr = do_find_service(bs, s, len, txn->sender_euid);
if (!ptr)
break ;
bio_put_ref(reply, ptr);
return 0 ;
从接口 getService 传递过来的 name,这个 name 是 SS 向 SM addService 的时候传递过来的 name。然后通过这个 name 查找 svcinfo 对象:
1
2
3
4
5
6
7
8
9
10
11
12
13
14
15
16
17
18
19
20
21
22
23
void *do_find_service(struct binder_state *bs, uint16_t *s, unsigned len, unsigned uid)
{
struct svcinfo *si;
si = find_svc(s, len);
if (si && si->ptr) {
if (!si->allow_isolated) {
unsigned appid = uid % AID_USER;
if (appid >= AID_ISOLATED_START && appid <= AID_ISOLATED_END) {
return 0 ;
}
}
return si->ptr;
} else {
return 0 ;
}
}
然后通过 binder_put_ref 使用 handle 构造 flat_binder_object 打包到要返回的数据里面:
1
2
3
4
5
6
7
8
9
10
11
12
13
14
15
16
17
18
19
20
21
22
23
24
25
26
27
28
29
30
31
32
33
34
35
36
37
38
39
40
41
42
43
44
45
46
47
48
49
50
51
void bio_put_ref(struct binder_io *bio, void *ptr)
{
struct binder_object *obj;
if (ptr)
obj = bio_alloc_obj(bio);
else
obj = bio_alloc(bio, sizeof (*obj));
if (!obj)
return ;
obj->flags = 0x7f | FLAT_BINDER_FLAG_ACCEPTS_FDS;
obj->type = BINDER_TYPE_HANDLE;
obj->pointer = ptr;
obj->cookie = 0 ;
}
static struct binder_object *bio_alloc_obj(struct binder_io *bio)
{
struct binder_object *obj;
obj = bio_alloc(bio, sizeof (*obj));
if (obj && bio->offs_avail) {
bio->offs_avail--;
*bio->offs++ = ((char *) obj) - ((char *) bio->data0);
return obj;
}
bio->flags |= BIO_F_OVERFLOW;
return 0 ;
}
static void *bio_alloc(struct binder_io *bio, uint32_t size)
{
size = (size + 3 ) & (~3 );
if (size > bio->data_avail) {
bio->flags |= BIO_F_OVERFLOW;
return 0 ;
} else {
void *ptr = bio->data;
bio->data += size;
bio->data_avail -= size;
return ptr;
}
}
这里使用的 bio_put_ref,这个函数填充的 flat_binder_object 类型是 handle,此外 SM 还有一个函数叫 bio_put_obj,那个是填充的是 binder 类型,不过 bio_put_obj 目前并没有被使用。所以 SM 保存的是 Bp 的 handle 值。其他的我不想多解释啥了,自己去对比下 Parcel 篇,writeStrongBinder 相关的代码,就几乎是一样的东西,换几个函数名而已。
那么 svcmgr_handler 的业务逻辑处理完了,主要是把数据都打包好了,然后后面就把把数据当作返回值发回去(通过 kernel 的 binder)。这里就要回去看 binder_parse BR_TRANSTION 最后那里的 binder_send_reply(名字都和 IPCThreadState 的 sendReply 很像):
1
2
3
4
5
6
7
8
9
10
11
12
13
14
15
16
17
18
19
20
21
22
23
24
25
26
27
28
29
30
31
32
33
34
35
36
37
38
39
40
41
42
43
44
45
46
47
48
49
50
51
52
53
54
55
56
57
58
void binder_send_reply(struct binder_state *bs,
struct binder_io *reply,
void *buffer_to_free,
int status)
{
struct {
uint32_t cmd_free;
void *buffer;
uint32_t cmd_reply;
struct binder_txn txn;
} __attribute__((packed)) data;
data.cmd_free = BC_FREE_BUFFER;
data.buffer = buffer_to_free;
data.cmd_reply = BC_REPLY;
data.txn.target = 0 ;
data.txn.cookie = 0 ;
data.txn.code = 0 ;
if (status) {
data.txn.flags = TF_STATUS_CODE;
data.txn.data_size = sizeof (int );
data.txn.offs_size = 0 ;
data.txn.data = &status;
data.txn.offs = 0 ;
} else {
data.txn.flags = 0 ;
data.txn.data_size = reply->data - reply->data0;
data.txn.offs_size = ((char *) reply->offs) - ((char *) reply->offs0);
data.txn.data = reply->data0;
data.txn.offs = reply->offs0;
}
binder_write(bs, &data, sizeof (data));
}
int binder_write(struct binder_state *bs, void *data, unsigned len)
{
struct binder_write_read bwr;
int res;
bwr.write_size = len;
bwr.write_consumed = 0 ;
bwr.write_buffer = (unsigned ) data;
bwr.read_size = 0 ;
bwr.read_consumed = 0 ;
bwr.read_buffer = 0 ;
res = ioctl(bs->fd, BINDER_WRITE_READ, &bwr);
if (res < 0 ) {
fprintf (stderr,"binder_write: ioctl failed (%s)\n" ,
strerror(errno));
}
return res;
}
其实这段有了前面 Parcel 篇的分析就不需要再多说什么了。只不过这里我们可以接着下面看完 kernel 中 binder_transtion BINDER_TYPE_HANDLE 的处理,上面 SM 是通过保存的 binder 对象指针发送 BINDER_TYPE_HANDLE 过去的(Bp):
1
2
3
4
5
6
7
8
9
10
11
12
13
14
15
16
17
18
19
20
21
22
23
24
25
26
27
28
29
30
31
32
33
34
35
36
37
38
39
40
41
42
43
44
45
46
47
48
49
50
51
52
53
54
55
56
57
58
59
60
61
62
63
64
65
66
67
68
69
70
case BINDER_TYPE_HANDLE:
case BINDER_TYPE_WEAK_HANDLE: {
struct binder_ref *ref = binder_get_ref(proc, fp->handle);
if (ref == NULL) {
binder_user_error("binder: %d:%d got "
"transaction with invalid "
"handle, %ld\n" , proc->pid,
thread->pid, fp->handle);
return_error = BR_FAILED_REPLY;
goto err_binder_get_ref_failed;
}
if (ref->node->proc == target_proc) {
if (fp->type == BINDER_TYPE_HANDLE)
fp->type = BINDER_TYPE_BINDER;
else
fp->type = BINDER_TYPE_WEAK_BINDER;
fp->binder = ref->node->ptr;
fp->cookie = ref->node->cookie;
binder_inc_node(ref->node, fp->type == BINDER_TYPE_BINDER, 0 , NULL);
binder_debug(BINDER_DEBUG_TRANSACTION,
" ref %d desc %d -> node %d u%p\n" ,
ref->debug_id, ref->desc, ref->node->debug_id,
ref->node->ptr);
} else {
struct binder_ref *new_ref;
new_ref = binder_get_ref_for_node(target_proc, ref->node);
if (new_ref == NULL) {
return_error = BR_FAILED_REPLY;
goto err_binder_get_ref_for_node_failed;
}
fp->handle = new_ref->desc;
binder_inc_ref(new_ref, fp->type == BINDER_TYPE_HANDLE, NULL);
binder_debug(BINDER_DEBUG_TRANSACTION,
" ref %d desc %d -> ref %d desc %d (node %d)\n" ,
ref->debug_id, ref->desc, new_ref->debug_id,
new_ref->desc, ref->node->debug_id);
}
} break ;
static struct binder_ref *binder_get_ref(struct binder_proc *proc,
uint32_t desc)
{
struct rb_node *n = proc->refs_by_desc.rb_node;
struct binder_ref *ref;
while (n) {
ref = rb_entry(n, struct binder_ref, rb_node_desc);
if (desc < ref->desc)
n = n->rb_left;
else if (desc > ref->desc)
n = n->rb_right;
else
return ref;
}
return NULL;
}
要 getService,肯定得先 addService,如果之前 SS 有 addService,那么这里的 binder_get_ref 肯定能取得对应 handle 值的 ref(这的 proc 是 SM,是 SM进 程发送 getService 的返回值的引起的 kernel binder 的 ioctl 调用的,别那么容易晕)。ref 有保存对应的 Service 所在的 proc。这里要判断下“出口转内销”的情况。就是发起 getService 的进程正好就是要取的 Service 所在的进程(这种情况很常见的,SS 的进程中有很多个 Service 的,经常要在一个 Service 调用另一个 Service 的接口,其实它们都在同一个进程,可以直接调用的,但是既然 binder 都封装好了,开发人员就应该专注业务功能,不用理会这些)。如果是的话,就把 flat_binder_object 变成 binder 类型的(node 中有保存本地的 binder 对象指针,所以可以转化的)。
如果不是的话,就老老实实调用 binder_get_ref_for_node 创建新的 ref 。这个函数前面 new SM 的 ref 的时候分析过了。唯一要注意的是传递的过去的 proc 是发起 getService 的。前面说了 ref 是进程相关的,必须要分配到要用 Bp 端的进程中才能正常使用。这个说这么多次,然我们们来看下原因吧。因为还是在 binder_transtion 这个函数里面,在这个函数最开始,通过 Bp handle 找 ref 那:
1
2
3
4
5
6
7
8
9
10
11
12
13
14
if (tr->target.handle) {
struct binder_ref *ref;
ref = binder_get_ref(proc, tr->target.handle);
if (ref == NULL) {
binder_user_error("binder: %d:%d got "
"transaction to invalid handle\n" ,
proc->pid, thread->pid);
return_error = BR_FAILED_REPLY;
goto err_invalid_target_handle;
}
target_node = ref->node;
我们假设,client proc 通过 getService 取得了 Bp 对象,然后通过 Bp 发起一次 IPC 调用。那么最后也是要到 binder_transtion 这里。然后这个 target.handle 就是通过 getService 取得的 Service 的 Bp 的 handle。这个 handle 是当初在 kernel 在 client proc 中分配的,并且保存在 client proc 的一颗红黑树中。所以这里就从 client proc 的这颗红黑树中取当初分配的 ref(key 是 handle 值,当然保存的时候也是按 handle 值构造红黑树的,所以现在查找的时候速度会非常快)。所以说 ref 是进程相关的,其实 node 也是进程相关的,就是提供 service 的进程自己保存了 node。 ref 中保存有 node,node 中保存有 proc ,所以 client 的请求可以激活阻塞等待的 service 进程,然后 service 执行 IPC 调用。
binder_transtion 转化 flat_binder_object 最后还有一个 case: BINDER_TYPE_FD,这个是转化 fd 的,去共享内存篇去看吧。
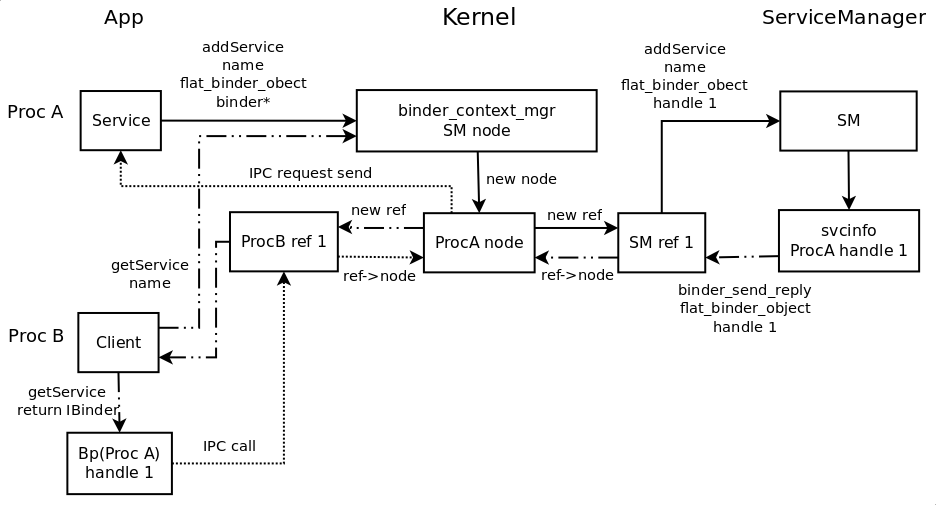
这样前面那几篇中的疑问就都清楚了。client 的 IPC 是怎么找到 service 的?? binder 对象怎么传递到别的进程使用?? 其实主要是在 kernel 的 binder 驱动中,所有的进程都可见,才能实现这些功能,可以说 kernel 给各个进程穿针引线了。最后来张图总结一下吧:
(稍微说明下,图中一共三条线;第一条 SS(ProcA)通过 addService 向 SM 注册,第二条 ProcB 通过 getService 向 SM 取 ProcA 的 binder 对象;第三条 ProcB 取回 ProcA 的 binder 对象后,通过其发起 IPC 调用)
那么 SS binder 对象的传递就说完了,那么还有第三方应用的咧。我发现这篇已经很长了,哎,本来先一篇讲完的,但是还是分开一篇吧。那么第三方应用 binder 对象传递就去看下一篇吧。